Tracking user interactions is essential for understanding website performance. Facebook Pixel helps monitor traffic, optimize ads, and retarget audiences. Here’s a quick guide to integrating Facebook Pixel into a Next.js project.

Install Facebook Pixel
Install the required package:
npm install react-facebook-pixelCreate a Pixel Tracker Component
// components/PixelTracker.ts
import { useEffect } from "react";
import ReactPixel from "react-facebook-pixel";
const PixelTracker = () => {
useEffect(() => {
const pixelId = "YOUR_PIXEL_ID";
ReactPixel.init(pixelId);
ReactPixel.pageView();
}, []); return null;
};export default PixelTracker;
Add the Tracker to Your Layout
Include the tracker in your app layout:
// app/layout.tsx
import dynamic from "next/dynamic";
Add the Tracker and Pixel Code to Your Layout
Update your root layout file to include the PixelTracker component and the Facebook Pixel <Head> meta code.
// app/layout.js
import dynamic from "next/dynamic";
const PixelTracker = dynamic(() => import("../components/PixelTracker"), { ssr: false });export default function RootLayout({ children }) {
return (
<html lang="en">
<head>
{/* Meta Pixel Code */}
<script
dangerouslySetInnerHTML={{
__html: `
!function(f,b,e,v,n,t,s)
{if(f.fbq)return;n=f.fbq=function(){n.callMethod?
n.callMethod.apply(n,arguments):n.queue.push
(arguments)}; if(!f._fbq)f._fbq=n;n.push=n;n.loaded=!
0;n.version='2.0';n.queue=[];t=b.createElement(e);
t.async=!0;t.src=v;s=b.getElementsByTagName(e)[0];
s.parentNode.insertBefore(t,s)}(window, document,
'script',
'https://connect.facebook.net/en_US/fbevents.js');
fbq('init', 'YOUR_PIXEL_ID');
fbq('track', 'PageView');
`,
}}
/>
<noscript>
<img
height="1"
width="1"
style={{ display: "none" }}
src="https://www.facebook.com/tr?id=YOUR_PIXEL_ID&ev=
PageView&noscript=1"/>
</noscript>
{/* End Meta Pixel Code */}
</head>
<body>
<PixelTracker />
{children}
</body>
</html>
);
}
This ensures the tracker and meta pixel code are properly embedded in your application.
your Pixel ID is correctly applied throughout the example code. Both the PixelTracker component and the <Head> meta pixel script explicitly use this Pixel ID.
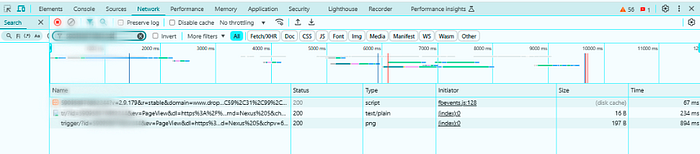
To confirm that the Facebook Pixel is working and your Pixel ID is correctly applied, follow these steps to check it in your browser’s Network tab:
- Open your website in a browser (e.g., Chrome).
- Right-click anywhere on the page and select Inspect.
- Go to the Network tab in the Developer Tools.
- Reload the page while the Developer Tools are open.
- In the Network tab, type
Your_Pixel_IDin the filter bar to narrow the results.